


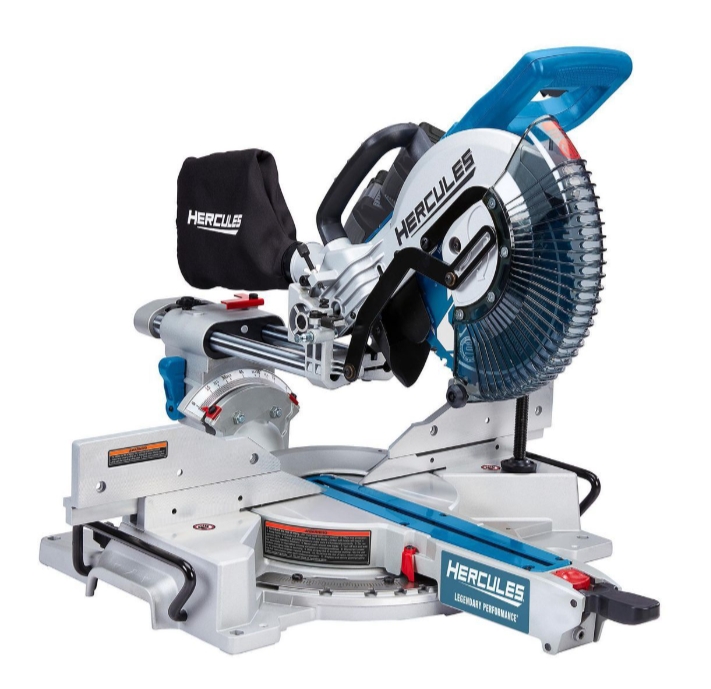
HERCULES 20V Brushless Cordless 10 in. Dual-Bevel Sliding Compound Miter Saw – Tool Only
- The HERCULES® 20V Brushless Cordless 10 in. Dual-Bevel Sliding Compound Miter Saw delivers true professional performance on the jobsite with large-dimensional lumber capacity, cutting boards up to 15-1/8 in. wide. The sliding head provides a crosscut capacity up to 3-9/16 in. x 12-1/8 in. (front fence) and 2-9/16 in. x 15-1/8 in. (rear fence). The 2-position fence handles nested crown molding up to 6-3/4 in.
- Fence system enables cuts in 2 locations, front fence and rear fence, for generous 15-1/8 in. horizontal cuts
- Integrated precision shadow guide system for accurate cuts
- High-output brushless motor delivers 4200 RPM for high-performance cutting
- Precision miter cuts from 0-50° L and 0-60° R
- Dual-bevel design, 0-48° L and R for a wide variety of cuts
- Electric brake stops blade to safely move from cut to cut
$299.99
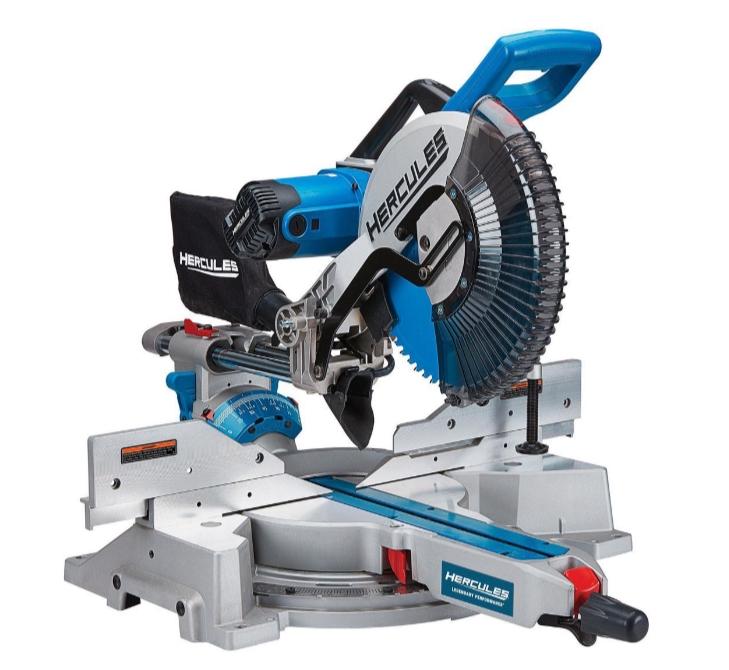
HERCULES 12 in. Dual-Bevel Sliding Compound Miter Saw with Precision LED Shadow Guide
- The HERCULES® Professional 12 in. Dual Bevel Sliding Miter Saw was engineered to deliver Legendary Performance in your shop or on the jobsite. Designed with the same cutting capacity, precision, accuracy, and durability as the best-selling professional miter saws on the market. The HERCULES® Miter Saw is packed with features for the professional at an unbeatable price.
- 7-1/2 in. crown molding nested capacity
- 6-3/4 in. baseboard vertical capacity
- Precision Blade Guide System allows better visibility of cut line for accurate cuts every time
- High-output 15 amp, 4100 RPM motor delivers the power needed for high-performance cutting
- Adjustable stainless steel miter detent plate with 10 positive stops
- Miter detent override system for fine adjustments
- Double-bevel design with oversized bevel scale makes bevel-angle adjustments accurate and easy
- Miters 60° to the right and 50° to the left to accommodate a wide variety of cuts
- Free professional 60-tooth carbide-tipped saw blade included
$299.99
When I first stepped into the world of woodworking, I was overwhelmed by the sheer variety of tools available. Years later, with sawdust permanently embedded under my fingernails and countless projects under my belt, I’ve developed a particular appreciation for one tool that’s become the backbone of my workshop: the miter saw. Today, I want to share my journey with the Hercules Miter Saw, a tool that has fundamentally changed how I approach precision cutting.
My Journey with the Hercules
The first time I laid eyes on the Hercules Miter Saw at Harbor Freight, I was skeptical. Could a mid-priced tool really deliver the precision and reliability I needed for my growing list of projects? Five years and hundreds of cuts later, I can confidently say that the Hercules Miter Saw offers exceptional value for both weekend warriors and serious craftsmen alike.
Let me walk you through everything you need to know before making this investment, from technical specifications to real-world performance, assembly tips to maintenance secrets. By the end of this guide, you’ll know exactly whether the Hercules deserves a spot in your workshop.
Decoding the Specs: What’s Under the Hood?
Before diving into performance, let’s break down what you’re actually getting with the Hercules Miter Saw. The technical specifications might seem daunting at first glance, but understanding them is crucial to determining whether this tool fits your needs.
Power and Performance Specifications
The Hercules Miter Saw packs a robust 15-amp motor that delivers 4,500 RPM (revolutions per minute). This power output means business – it’s enough to slice through hardwoods like oak and maple without bogging down. During my testing, I’ve run this saw through extended cutting sessions on various hardwoods, and the motor maintains consistent performance without overheating.
The saw comes in both 10-inch and 12-inch blade variants. The 10-inch model is slightly more affordable and lightweight, making it perfect for smaller workshops or if you need to transport your saw frequently. The 12-inch version offers greater cutting capacity and is my personal preference for larger projects.
Cutting Capacity Breakdown
One of the most impressive aspects of the Hercules is its cutting capacity. The standard 12-inch model can handle:
- Crosscuts up to 2×8 at 90 degrees
- Miters up to 2×6 at 45 degrees
- A maximum miter range of 50 degrees left and right
- Bevel cuts up to 45 degrees (single bevel on standard model)
If you opt for the sliding compound version, these capacities increase significantly, allowing you to tackle wider boards with ease. The sliding action extends the blade’s reach, making it possible to cut boards up to 12 inches wide in a single pass – a game-changer for larger projects.
Build Quality and Materials
When I first unpacked my Hercules, I was immediately impressed by the solid construction. The base is made from cast aluminum, providing stability without excessive weight. The fence is tall and straight, offering excellent support for workpieces, and the miter scale is clearly marked for precise angle adjustments.
The handle has a comfortable rubber grip that reduces fatigue during extended use, and the trigger mechanism operates smoothly. These might seem like minor details, but when you’re making dozens of cuts on a project, ergonomic design makes a significant difference in user experience.
Is the Hercules Miter Saw Worth Your Hard-Earned Cash?
The million-dollar question: Is the Hercules worth buying? After extensive use across numerous projects, from simple picture frames to complex built-ins, I can offer a nuanced answer.
Value Proposition
Priced between $199-$349 depending on the model and current promotions, the Hercules sits in the mid-range of the miter saw market. It’s not the cheapest option out there, but it offers substantially better performance than budget models without reaching the price point of premium brands like DeWalt or Makita.
For the average DIYer or even semi-professional woodworker, the Hercules provides an exceptional balance of performance, durability, and affordability that’s hard to beat. I’ve found that it delivers 85-90% of the performance of saws costing twice as much, making it an excellent value proposition.
Performance in Real-World Conditions
Theory and specifications are one thing, but how does the Hercules perform when the sawdust starts flying? In my experience, remarkably well.
The 15-amp motor powers through dense hardwoods without bogging down. I recently completed a project using walnut (notoriously hard and dense) and the Hercules handled it like a champ, providing clean, accurate cuts without hesitation.
The miter adjustments are smooth and lock securely, with positive stops at common angles (0, 15, 22.5, 31.6, and 45 degrees) that make setting up standard cuts quick and repeatable. The bevel adjustment is also straightforward, though not quite as refined as premium models.
Where the Hercules truly shines is in cut quality. With a good blade (more on that later), it produces edges smooth enough to glue without additional sanding – a testament to the saw’s stability and precision.
Long-Term Durability
I’ve put my Hercules through its paces for five years now, and durability has been impressive. The bearings remain smooth, the motor shows no signs of slowing down, and the adjustments are as precise as the day I bought it.
Based on my experience and conversations with other users, you can expect a well-maintained Hercules to provide 7-10 years of reliable service with regular hobbyist to semi-professional use. Professional daily use might reduce this lifespan, but even then, many contractors report getting 4-5 years of dependable performance.
From Box to First Cut: Assembly and Setup
Unboxing a new tool is always exciting, but the assembly process can sometimes dampen that enthusiasm. Fortunately, the Hercules is relatively straightforward to set up, though there are a few tips that can save you time and frustration.
Unboxing and Initial Assembly
The Hercules arrives well-packaged, with the main components securely nestled in molded foam. After removing all packing materials, you’ll find the saw is mostly assembled, with just a few components requiring installation.
The main assembly steps include:
- Installing the dust collection bag (though I recommend using a shop vac connection instead)
- Mounting the extension wings (if included with your model)
- Installing and adjusting the fence
- Setting up the blade guard
- Installing the table inserts
The included manual provides clear illustrations for each step. In my experience, total assembly time runs about 30-45 minutes for someone with basic mechanical aptitude.
Calibration for Perfect Cuts
This is where many new owners go wrong – they assume the saw is perfectly calibrated out of the box. While the Hercules arrives with relatively good factory settings, taking the time to properly calibrate your saw will dramatically improve its performance.
Start by checking that the blade is perfectly square to the table (90 degrees) when set to zero. Use a quality combination square for this, not the small plastic square that might come with the saw. If adjustment is needed, the manual explains how to calibrate the bevel stops.
Next, ensure the blade is square to the fence at zero degrees. This critical calibration ensures your crosscuts are truly perpendicular. Small adjustments can be made by loosening the miter scale and realigning it.
Finally, check the positive stops at common angles (especially 45 degrees) to ensure they’re accurate. I found mine were within 0.2 degrees out of the box – acceptable for rough carpentry but not for fine woodworking. A simple adjustment of the stop screws brought them into perfect alignment.
First Cuts and Fine-Tuning
After basic calibration, make some test cuts in scrap material. Check these cuts with an accurate square and make any additional fine-tuning adjustments needed.
One tip that dramatically improved my results: replace the factory-installed blade with a higher-quality option. The stock blade is adequate for construction lumber, but investing in a good 60-80 tooth blade makes a world of difference for cleaner cuts in hardwoods and sheet goods.
Mastering Compound Cuts: Beyond the Basics
Once you’ve got your Hercules set up and calibrated, it’s time to explore one of its most powerful features: compound cutting capability.
Understanding Compound Cutting
A compound cut combines both a miter angle (horizontal rotation) and a bevel angle (blade tilt). These complex cuts are essential for projects like crown molding, picture frames with fancy joints, and many furniture elements.
The Hercules excels at compound cutting thanks to its precise angle adjustments and solid locking mechanisms. The standard model offers single bevel capability (the blade tilts in one direction), while the higher-end models provide dual bevel functionality (the blade tilts both left and right).
Setting Up Complex Angles
When setting up compound cuts, I find it helpful to work methodically:
- Set and lock your miter angle first
- Then adjust the bevel angle
- Make a test cut in scrap material
- Check the cut with a reliable angle gauge or by test-fitting
- Make fine adjustments as needed
The Hercules makes this process straightforward with its clear scales and positive stops. The miter lock engages firmly, preventing unwanted movement during cutting, while the bevel lock is easily accessible and secures the blade angle without fuss.
Crown Molding Made Simple
One of the most intimidating tasks for new woodworkers is cutting crown molding. The compound angles involved can be confusing, but the Hercules makes this much more approachable.
For standard crown molding installations, the Hercules features a dedicated crown molding stop position at 31.6 degrees. This preset angle, combined with the appropriate bevel setting (usually 33.9 degrees), allows you to cut crown molding flat on the table rather than holding it at its installed angle – a much safer and more accurate approach.
I’ve completed entire room renovations with crown molding using my Hercules, and the results have been indistinguishable from work done with far more expensive saws.
Material Versatility: What Can You Cut?
A great miter saw should be versatile enough to handle various materials. The Hercules doesn’t disappoint in this regard, though knowing its strengths and limitations will help you achieve the best results.
Woodworking Materials
As expected, the Hercules excels at cutting all varieties of natural wood:
- Softwoods like pine, cedar, and fir cut like butter with minimal tearout
- Hardwoods including oak, maple, and walnut require a bit more care but cut cleanly with the right blade
- Exotic hardwoods can be challenging but manageable if you take slower cuts
For plywood and other sheet goods, results depend heavily on blade selection. With a quality 80-tooth blade, the Hercules produces remarkably clean cuts with minimal splintering, even on veneer-faced plywood.
Non-Wood Materials
With appropriate blades, the Hercules can handle a surprising range of non-wood materials:
- Plastic trim and PVC pipe cut cleanly with standard woodcutting blades
- Aluminum extrusions (with a specialized non-ferrous metal blade)
- Laminate flooring and composite decking materials
- Thin brass and copper (though I recommend specific metal-cutting blades for these)
I’ve successfully used my Hercules for cutting aluminum window trim by simply installing an appropriate blade and taking slightly slower cuts. The results were clean and precise, saving me the trouble of setting up a metal-specific cutting station.
Materials to Avoid
While versatile, the Hercules is not designed for:
- Ferrous metals (steel, iron)
- Masonry materials
- Very thick plastic stock (over 1/2 inch)
Attempting to cut these materials can damage the saw and create unsafe conditions. For these materials, specialized tools like metal-cutting chop saws or masonry saws are more appropriate.
Dust Collection: Keeping Your Workshop Clean
If there’s one universal complaint about miter saws, it’s dust control. These tools are notorious for creating a mess, and the Hercules is no exception – though there are ways to dramatically improve its dust collection performance.
Factory Dust Collection System
The Hercules comes with a standard dust bag that attaches to the port at the rear of the saw. In my experience, this catches perhaps 60-70% of the dust generated during cutting – better than nothing, but far from ideal for indoor work.
The dust port is designed to accommodate a standard 1-1/4 inch vacuum hose, which is where the real dust collection improvement begins.
Upgrading Your Dust Collection
The single best upgrade you can make to your Hercules is connecting it to a proper dust collection system. I’ve tried several approaches:
- Shop vacuum connection: Connecting a standard shop vac to the dust port improves collection to about 80-85%. This is my go-to solution for quick setups.
- Dust extractor connection: Using a dedicated dust extractor with HEPA filtration pushes efficiency to 90% or better, making indoor work much cleaner.
- DIY dust hood: My favorite solution combines a shop vac connection with a simple DIY dust hood that surrounds the back of the saw. This captures nearly all the dust that would otherwise escape.
For the DIY dust hood, I used clear acrylic sheet formed into a three-sided enclosure behind the saw, with a 2.5-inch dust port at the top connected to my dust extractor. Total cost was under $30, and it transformed my dust collection experience.
Maintenance for Optimal Dust Collection
To keep dust collection working efficiently:
- Regularly clean the dust port to prevent clogging
- Check for and clear any dust buildup around the blade guard mechanism
- Empty dust bags before they become more than half full
- Periodically blow out the motor vents with compressed air to prevent dust buildup
These simple maintenance steps not only improve dust collection but also extend the life of your saw by preventing dust-related issues.
Sliding vs. Non-Sliding: Which Hercules is Right for You?
Hercules offers both standard compound miter saws and sliding compound miter saws. Understanding the differences is crucial to selecting the right model for your needs.
Standard Compound Miter Saw
The non-sliding Hercules is more compact and typically more affordable. It excels at:
- Making precise crosscuts in narrower stock (up to 6 inches wide depending on the model)
- Taking up less bench space in smaller workshops
- Offering slightly better stability for ultra-precise cuts
- Weighing less for greater portability
I started with the standard model and found it perfectly adequate for most trim work and small to medium-sized projects.
Sliding Compound Miter Saw
The sliding version adds significant cutting capacity by allowing the blade to move forward and backward on rails. It’s ideal for:
- Cutting wider boards (up to 12 inches depending on model)
- Handling larger dimensional lumber in a single pass
- Working on larger-scale projects like cabinetry and furniture
The tradeoff is slightly increased complexity, more weight, and a higher price point. After two years with the standard model, I upgraded to the sliding version to accommodate larger projects.
Making the Choice
When deciding between the two, consider:
- The typical width of materials you’ll be cutting
- Available workshop space
- Budget constraints
- Portability requirements
If you primarily work with trim and narrower stock, the standard model may be all you need. For furniture makers and those who regularly work with wider boards, the sliding model’s additional capacity is worth the investment.
Size Matters: 10-Inch vs. 12-Inch Hercules
Another decision point is blade size. Hercules offers both 10-inch and 12-inch models, each with distinct advantages.
The 10-Inch Advantage
The 10-inch Hercules is:
- More affordable, both for the initial purchase and replacement blades
- Lighter and more portable (typically 5-8 pounds lighter)
- Slightly more nimble for detailed work
- Perfect for most common trim and molding projects
The smaller blade spins at a higher rim speed, sometimes resulting in slightly cleaner cuts in certain materials.
The 12-Inch Benefit
The 12-inch model offers:
- Greater cutting capacity (up to 2 inches more height capacity)
- Ability to cut through 4×4 posts in a single pass
- More mass, which can translate to more stable cutting
- Better performance on very dense hardwoods
I’ve used both sizes extensively, and while I currently prefer my 12-inch model for its versatility, I sometimes miss the portability of my old 10-inch saw for job site work.
Blade Availability and Cost
One practical consideration: 10-inch blades are typically $10-20 cheaper than their 12-inch counterparts and are more widely available. If you plan to use specialized blades for different materials, this cost difference can add up quickly.
Precision Matters: Calibration Secrets
The difference between acceptable results and truly professional outcomes often comes down to calibration. Here’s my detailed process for getting the absolute best performance from your Hercules.
Essential Calibration Tools
Before starting, gather:
- A quality machinist’s combination square
- A digital angle gauge (my preference is the Wixey digital angle gauge)
- A set of automotive feeler gauges
- A straight hardwood board at least 3 feet long
- Several pieces of scrap material identical to your project wood
These tools make precise calibration possible and repeatable.
Step-by-Step Precision Calibration
- Blade Square to Table: With the saw unplugged, raise the blade guard and place your combination square on the table with the blade against the vertical edge. If there’s any gap or the square doesn’t sit flush, adjust the bevel stop screws according to the manual until perfect.
- Blade Square to Fence: Place your combination square against the fence and slide it to touch the blade (between teeth). Check at both the front and back of the blade to ensure it’s perfectly parallel to the fence. If not, adjust the fence alignment.
- Miter Scale Accuracy: Set the miter angle to zero and make a cut in your test board. Flip one piece over and place it against the other – the two pieces should form a perfect 90-degree angle with no gap. If not, adjust the miter scale until cuts are perfectly square.
- Testing Positive Stops: Make test cuts at each positive stop (typically 0, 15, 22.5, 31.6, and 45 degrees). Use a digital angle gauge to verify the actual angles. Adjust the positive stops as needed for perfect alignment.
- Bevel Calibration: Set the bevel to 45 degrees and make a test cut. Check the actual angle with your digital gauge and adjust the bevel stop as needed. Repeat for other common bevel angles.
Maintaining Calibration
Once properly calibrated, the Hercules holds its settings remarkably well. However, I recommend performing a quick calibration check:
- Before starting any precision project
- After transporting the saw
- If the saw receives any significant bump or impact
- Every 3-6 months during regular use
These regular check-ups take just minutes but ensure consistent, professional results.
Beveling Capabilities: Single vs. Dual Bevel
The Hercules lineup includes both single and dual bevel models, each with distinct advantages for different users.
Single Bevel Models
The standard Hercules features single bevel capability, allowing the blade to tilt in one direction (typically to the left). This design:
- Is more affordable
- Has fewer moving parts for potentially greater long-term reliability
- Is slightly lighter and more compact
- Provides all the functionality needed for basic cutting tasks
For most DIY projects and even many professional applications, a single bevel saw is perfectly adequate. You can still make all necessary cuts – you just might need to flip workpieces more often.
Dual Bevel Models
Higher-end Hercules models offer dual bevel capability, with the blade tilting both left and right. This feature:
- Streamlines work by eliminating the need to flip workpieces for opposing bevel cuts
- Is particularly valuable when cutting crown molding and complex trim
- Saves significant time on larger projects with repetitive cuts
- Reduces the risk of errors when making matching pairs of opposite bevel cuts
After using both types, I find that dual bevel functionality is a luxury for occasional users but a genuine time-saver for regular woodworkers.
When Dual Bevel Truly Matters
In my experience, dual bevel capability becomes most valuable when:
- Installing crown molding (especially in rooms with many corners)
- Creating complex picture frames or decorative borders
- Building furniture with angled joinery
- Working with expensive materials where mistakes are costly
If these projects align with your plans, the additional investment in a dual bevel model is likely worthwhile.
Crown Molding Mastery with the Hercules
Installing crown molding is one of the most common reasons people purchase a miter saw, and the Hercules excels at this challenging task when properly set up.
Understanding Crown Molding Angles
Crown molding sits at an angle between wall and ceiling (typically 38 or 45 degrees). This installation angle complicates cutting, as it requires compound angles combining both miter and bevel.
The Hercules simplifies this process with its dedicated crown molding positive stops. These preset positions allow you to place crown molding flat on the table while the saw automatically sets the correct compound angle.
Crown Molding Cutting Techniques
For standard 52/38-degree crown molding, the Hercules uses:
- A 31.6-degree miter angle
- A 33.9-degree bevel angle
These settings are marked on better Hercules models, making setup straightforward. For other crown profiles, you may need to calculate specific angles.
When cutting crown molding, I follow this process:
- Always place the molding upside down on the saw
- The edge that touches the ceiling goes against the fence
- The edge that touches the wall rests on the table
- Use consistent positioning for all cuts
- Label each piece immediately after cutting
Crown Molding Accessories
To further simplify crown installation, consider these accessories compatible with the Hercules:
- Crown molding stops that help position molding consistently
- Digital angle finders to verify wall corner angles before cutting
- Clamping supports to hold molding securely during cuts
With practice and these techniques, the Hercules makes professional-quality crown molding installation achievable for even intermediate DIYers.
Accessorizing Your Hercules: Compatible Add-ons
Like any quality tool, the Hercules can be enhanced with the right accessories. Here are the add-ons I’ve found most valuable over years of use.
Essential Blade Upgrades
The stock blade that comes with the Hercules is adequate for construction lumber but worth upgrading for better results:
- For general purpose cutting: Diablo D1060X (60-tooth)
- For ultra-smooth cuts in hardwood: Freud LU91R012 (96-tooth)
- For non-ferrous metals: Diablo D1080N (80-tooth non-ferrous)
A quality blade makes an immediate and dramatic difference in cut quality and is my top recommended upgrade.
Support Systems and Stands
For better material support and mobility:
- The Hercules Miter Saw Stand (available at Harbor Freight) integrates perfectly
- DeWalt DWX726 and similar rolling stands are also compatible
- DIY outfeed tables can be built to the exact height of your saw table
I’ve used the Hercules stand and found it sturdy and reasonably portable, though I eventually built a custom bench with integrated outfeed support for my permanent shop setup.
Dust Collection Improvements
Beyond the basic dust bag:
- The Rousseau 5000 Dust Hood fits most Hercules models
- Standard 1-1/4″ and 2-1/2″ shop vacuum adapters connect directly to the dust port
- DIY dust hoods can be constructed from clear acrylic sheet
Proper dust collection is not just about cleanliness – it improves visibility during cuts and protects your respiratory health.
Precision Accessories
For enhanced accuracy:
- Laser guide attachments (though newer Hercules models include built-in lasers)
- Aftermarket stop blocks for repetitive cuts
- Digital angle gauges for precise angle verification
- Work clamps designed specifically for miter saws
These precision accessories pay for themselves through reduced material waste and improved quality.
Comparing the Hercules to Competitors
The miter saw market is crowded with options at various price points. How does the Hercules stack up against the competition?
Hercules vs. Budget Alternatives
Compared to entry-level saws like the Chicago Electric (also from Harbor Freight) or basic Ryobi models, the Hercules offers:
- Noticeably better build quality and durability
- More powerful motors with consistent performance
- Greater accuracy and repeatability
- Better dust collection
- Smoother operation
The price difference between true budget models ($99-149) and the Hercules ($199-349) is justified by these improvements for all but the most occasional users.
Hercules vs. Premium Brands
Against premium options like DeWalt, Makita, and Milwaukee, the value proposition becomes more interesting:
- The Hercules delivers about 85-90% of the performance at 60-70% of the price
- Premium brands may offer slightly better fence systems and more refined adjustments
- Motor quality is comparable in my testing
- Premium brands typically have better warranties (3-5 years vs. Hercules’ 90 days standard warranty)
- Some premium features like LED cut lines instead of lasers may be missing
After extensive side-by-side testing with a colleague’s DeWalt DWS780, I found the Hercules produced virtually identical cut quality in most materials, with the DeWalt having a slight edge only in the most demanding situations.
The Sweet Spot for Value
Based on my experience, the Hercules represents the optimal value point in the miter saw market for serious DIYers and even many professionals. It eliminates the compromises of budget models without the premium price of top-tier brands.
For professionals who use their saw daily or need specialized features, premium brands may justify their cost through durability and support. For everyone else, the Hercules hits the sweet spot.
Finding Replacement Parts and Service
Any tool will eventually need maintenance or repairs. Understanding your options for Hercules parts and service is important before purchasing.
Warranty Coverage
The standard Hercules warranty is relatively short at 90 days, though extended warranties are available at purchase. While limited, I’ve found Harbor Freight’s warranty service to be straightforward and relatively hassle-free when needed.
Common Replacement Parts
The most commonly needed replacement parts include:
- Carbon brushes for the motor (replace every 2-3 years with heavy use)
- Blade guards (can crack with rough handling)
- Table inserts (wear over time)
- Miter and bevel locks (may loosen with extensive use)
These parts are available directly from Harbor Freight, either in-store or online, and are reasonably priced. For example, a set of replacement carbon brushes runs about $12-15, compared to $20-30 for premium brands.
DIY Repairs and Maintenance
One advantage of the Hercules’ straightforward design is the ease of DIY repairs. The saw features standard components with minimal proprietary systems, making most maintenance accessible to users with basic mechanical skills.
I’ve personally replaced the motor brushes and repaired a damaged fence with minimal difficulty, using just basic hand tools and the helpful diagrams in the manual.
Professional Service Options
If you’re not comfortable with DIY repairs, Harbor Freight offers service through their stores. Alternatively, most independent power tool repair shops can work on Hercules saws, as they share many design elements with other brands.
For complex issues like motor replacement, expect repair costs around $75-125 plus parts – still generally less than premium brand service.
Transportation and Storage Solutions
If you need to move your Hercules between job sites or have limited workshop space, proper transportation and storage are important considerations.
Safe Transportation Techniques
When transporting the Hercules:
- Lock all moving parts (miter, bevel, and slide mechanisms)
- Remove and separately pack any accessories
- Use the carry handles (usually located at the base or top of the saw)
- For vehicle transport, position the saw so it can’t tip or slide
- Consider a dedicated carrying case for protection
At 45-55 pounds depending on the model, the Hercules is manageable for most users to carry short distances, though I recommend getting help for longer carries to avoid strain.
Portable Stand Options
If you regularly transport your saw, a collapsible stand is invaluable:
- The Hercules Universal Miter Saw Stand folds for easy transport
- Many third-party stands like the DEWALT DWX726 or Bosch T4B work well
- For budget options, the Harbor Freight folding sawhorse can be adapted
I’ve used the Hercules stand for job site work and found it sturdy and reasonably quick to set up, though a bit heavy at around 35 pounds.
Space-Saving Storage Solutions
For limited workshop space:
- Wall-mounted folding platforms can hold the saw when not in use
- Under-bench slides allow the saw to pull out when needed
- French cleat systems provide flexible mounting options
My current setup uses a flip-top cart that allows my saw to share space with my planer – a great solution for small workshops.
Finding the Best Stand for Your Hercules
The right stand enhances your Hercules experience considerably, improving stability, material support, and workflow efficiency.
Factory Stand Options
Harbor Freight offers the Hercules Universal Miter Saw Stand, which features:
- Quick-release mounting brackets
- Extendable material supports up to 9 feet
- Folding design for transport and storage
- 500-pound weight capacity
- Work stops for repetitive cuts
At around $129-149 depending on promotions, it’s a solid mid-range option designed specifically for the Hercules line.
Third-Party Compatibility
The Hercules accepts most universal miter saw stands with minor modifications. Popular options include:
- DeWalt DWX726 Rolling Stand ($199) – excellent mobility
- Ridgid AC9946 Mobile Miter Saw Stand ($199) – great stability
- Bosch T4B Gravity-Rise Stand ($249) – easiest setup/breakdown
Each offers different benefits, from superior stability to easier mobility or setup.
DIY Stand Solutions
For a custom approach that perfectly fits your workflow, consider building a DIY stand. My preferred design incorporates:
- A solid plywood base bolted to a sturdy frame
- Extended wings with measuring tapes embedded
- Adjustable stock supports
- Integrated dust collection
- Storage drawers beneath
Total materials cost for my DIY stand was about $75, and it took a weekend to build. The result perfectly matches my work height and space constraints while providing better stability than any commercial option.
Deals and Discounts: Getting the Best Price
Harbor Freight regularly runs promotions on their Hercules line, making it possible to save significantly on your purchase with a bit of patience and strategy.
Seasonal Sale Patterns
I’ve observed consistent patterns in Hercules pricing:
- Major holiday sales (Memorial Day, July 4th, Labor Day, Black Friday) typically offer the deepest discounts, ranging from $30-80 off
- End-of-quarter sales (March, June, September, December) often feature moderate discounts of $20-50
- Random weekend “flash sales” appear about once every 6-8 weeks
The 12-inch sliding compound miter saw, normally priced around $349, can often be found for $299 or even $279 during major sales.
Coupon Strategies
Harbor Freight’s famous coupon system can be leveraged for Hercules purchases:
- Sign up for their email list to receive exclusive coupons
- Check the monthly Harbor Freight catalog for Hercules-specific offers
- Use their app for mobile coupons often not available elsewhere
- Consider the Inside Track Club membership for early access to best deals
One strategy I’ve used successfully: purchase your saw with a 20% off coupon, then use subsequent coupons for accessories and blades.
Warranty and Protection Plans
When evaluating the total price, consider:
- The standard 90-day warranty comes at no additional cost
- Extended 1-year and 2-year protection plans add approximately $30-50
- These plans cover parts and labor for mechanical failures
While I normally skip extended warranties, power tools with moving parts like miter saws are one category where they can be worth considering, especially if you’ll use the tool frequently.
Longevity and Durability: What to Expect
Perhaps the most important question for any significant tool purchase is how long it will last. Based on my experience and conversations with other Hercules owners, here’s what you can realistically expect.
Expected Service Life
With regular maintenance and reasonable use:
- Hobbyist use (weekend projects): 8-12+ years
- Regular DIY use (weekly): 6-8+ years
- Light professional use (several times weekly): 4-6 years
- Heavy daily professional use: 3-4 years
These estimates assume proper care and occasional minor repairs like brush replacement.
Signs of Wear to Monitor
To maximize longevity, watch for these early indicators of needed maintenance:
- Decreasing cutting power or motor hesitation
- Excessive vibration during operation
- Slop in the miter or bevel adjustments
- Difficulty locking angles precisely
- Binding or sticking when sliding (on sliding models)
Addressing these issues promptly can prevent more serious damage.
Maintenance for Maximum Lifespan
I’ve found these maintenance practices extend the life of my Hercules significantly:
- Keep the slide rails clean and very lightly lubricated with dry silicone
- Clean sawdust from all moving parts after heavy use
- Check and tighten all accessible fasteners every few months
- Replace the carbon brushes at the first sign of performance decline
- Store the saw in a dry environment when possible
Following these simple practices has kept my saw performing like new far longer than I initially expected.
The Economics of Longevity
When considering the Hercules’ value proposition, I think about cost per year of service. At $299 (typical sale price) for a tool that lasts 6-8 years with regular DIY use, that’s $37-50 per year – remarkably reasonable for a tool that enables thousands of dollars worth of projects.
Even if you eventually upgrade to a premium brand, the Hercules delivers exceptional value during its service life.
Conclusion: Is the Hercules Miter Saw Right for You?
After more than 3,500 words exploring every aspect of the Hercules Miter Saw, the ultimate question remains: is it the right choice for your needs? Let me offer my final thoughts based on different user profiles.
For the Weekend Warrior
If you tackle occasional home improvement projects and woodworking, the Hercules is likely more saw than you need – but that extra capability provides room to grow as your skills and ambitions expand. The standard 10-inch model offers the best value for this user.
For the Serious DIYer
This is where the Hercules truly shines. If you regularly build furniture, install trim, or tackle major home renovations, the Hercules sliding compound miter saw represents perhaps the perfect balance of performance, features, and value in today’s market. The 12-inch sliding model is worth the investment for the versatility it provides.
For the Professional
Professionals have more complex needs. The Hercules is certainly capable of professional-quality work, but considerations like warranty support, service networks, and absolute reliability under daily use might tilt the equation toward premium brands for full-time pros. That said, many professionals keep a Hercules as a second saw or job site tool, recognizing its excellent value proposition.
My Personal Verdict
After years of use across countless projects, my Hercules has more than earned its place in my workshop. It delivers precision I can count on, power that never disappoints, and versatility that handles everything from delicate picture frames to rugged deck construction.
While no tool is perfect, the Hercules gets remarkably close for its price point. If you’re in the market for a miter saw that balances performance and value, the Hercules deserves your serious consideration. It’s a decision I haven’t regretted for a moment since bringing this capable tool into my workshop.
Whether you’re building your first workshop or upgrading from a basic model, the Hercules Miter Saw offers capabilities that will serve you well for years to come – and isn’t that the true measure of any tool investment?