


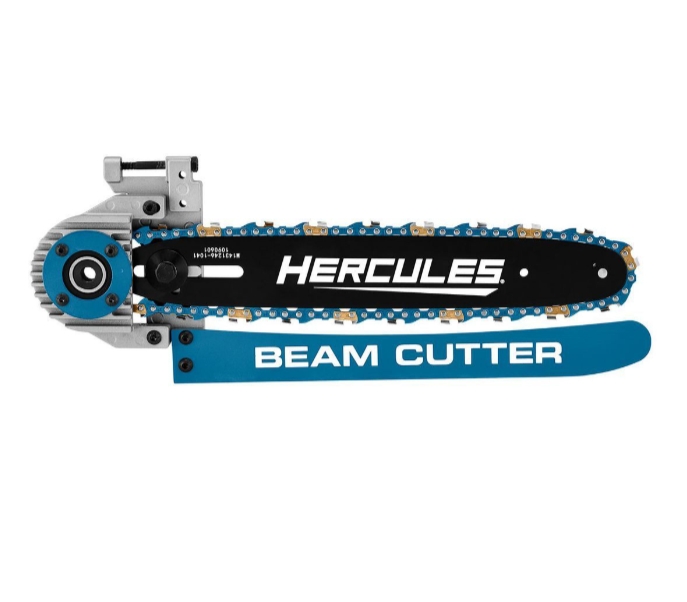
HERCULES Circular Saw Beam Cutter Attachment
- The HERCULES™ Circular Saw Beam Cutter Attachment mounts securely to conventional or worm drive circular saws to cut beams as thick as 12 in. Use this attachment to cut beams, posts, rafters, stair stringers, railroad ties, and logs in one pass.
- Low-profile anti-kickback chain makes clean cross and rip cuts
- Guide bar ensures straight cuts for the width of the beam
- Automatic oiling system for improved cutting performance and longer chain life
- Up to 12 in. cut capacity
- Securely mounts to both conventional and worm drive saws
- Includes beam cutter attachment, hardware, and mounting brackets
$79.99
When I first stumbled upon the Hercules Circular Saw Beam Cutter Attachment in my endless quest to upgrade my workshop, I had no idea how dramatically it would transform my woodworking capabilities. Like many DIY enthusiasts and even professional contractors, I’d been struggling with making clean, precise cuts on larger beams and dimensional lumber. The frustration of wobbly cuts, kickback scares, and wasted material was becoming the norm rather than the exception.
Then everything changed.
Today, I’m sharing my complete journey with this game-changing tool attachment—from initial skepticism to becoming what I now consider an essential part of my workshop arsenal. If you’ve ever struggled with cutting large beams or wondered if there’s a better way to handle dimensional lumber with your circular saw, this comprehensive guide is for you.
What Exactly Is the Hercules Circular Saw Beam Cutter Attachment?
Let’s start with the basics. The Hercules Circular Saw Beam Cutter Attachment is an ingenious device designed to transform your standard circular saw into a powerful and precise beam cutting machine. This attachment essentially converts your handheld circular saw into a specialized tool capable of making clean, straight cuts through dimensional lumber, beams, and posts with remarkable accuracy and safety.
Before discovering this attachment, I was using a combination of cumbersome methods to cut larger pieces—sometimes employing a miter saw for smaller beams, jury-rigging guides for my circular saw, or even resorting to handsaws for certain cuts. None of these solutions offered the precision, speed, and safety I needed, especially when working with 4×4s, 6×6s, or larger beams.
The Hercules attachment solves these problems with a straightforward design. It clamps securely to your existing circular saw and provides a stable platform with guide rails that allow you to make perfectly square or angled cuts through dimensional lumber. Think of it as giving your circular saw superpowers.
How the Hercules Beam Cutter Attachment Actually Works
The genius of the Hercules attachment lies in its relatively simple mechanical design that produces remarkable results. After using it for over a year on dozens of projects, I can confidently explain its operation.
The attachment consists of several key components:
- A mounting bracket that securely attaches to your circular saw
- Adjustable guide rails that ensure straight, precise cuts
- A sturdy base plate that provides stability during cutting
- Clamping mechanisms that secure the attachment to your workpiece
- Angle adjustment features for making angled cuts
When properly installed, the attachment transforms the cutting process. Instead of trying to manually guide your circular saw along a pencil line (which we all know can lead to wandering cuts), the Hercules attachment locks your saw in place and guides it along a predetermined path. The result? Cuts that are astonishingly square, clean, and consistent every single time.
The process to use it is remarkably straightforward:
- Attach the Hercules to your circular saw
- Position the attachment on your beam or lumber
- Secure it with the integrated clamping system
- Set your desired cutting angle (if not making a square cut)
- Power up your saw and guide it through the cut
The first time I used it on a 6×6 pressure-treated post for a deck project, I was genuinely amazed at how effortlessly it sliced through the wood, leaving a factory-perfect edge that required zero additional work. That moment convinced me this attachment was worth every penny.
Compatibility: Will It Work With Your Circular Saw?
One of the most common questions I receive from fellow woodworkers is whether the Hercules attachment will work with their specific circular saw model. It’s a critical consideration before making your purchase.
The Hercules Beam Cutter Attachment is designed to be compatible with most standard 7-1/4″ circular saws from major manufacturers. This includes popular brands like:
- DeWalt
- Makita
- Milwaukee
- Skilsaw
- Bosch
- Ryobi
- Black & Decker
- And yes, Harbor Freight’s own Hercules line
However, I’ve discovered through experience (and some trial and error) that certain saw models fit more seamlessly than others. The key factors determining compatibility are:
- The base plate configuration of your saw
- The motor housing design and positioning
- The location of adjustment knobs and levers
- The overall weight and balance of your saw
From personal experience, I found that my DeWalt DWE575 and Milwaukee 2732-20 both paired exceptionally well with the attachment. My older Ryobi required some minor adjustments to the mounting bracket, but ultimately worked fine. The attachment seemed almost purpose-built for Harbor Freight’s own Hercules circular saws, which is no surprise given the branding.
If you’re uncertain about compatibility with your specific model, I recommend taking measurements of your saw’s base plate and checking them against the attachment specifications. Alternatively, bringing your saw to a Harbor Freight store for a test fit before purchasing can save potential headaches.
Materials the Hercules Attachment Can Handle
After extensive use across multiple projects, I can definitively say that the versatility of materials this attachment can handle is impressive. The Hercules Beam Cutter excels at cutting virtually all standard dimensional lumber and engineered wood products commonly used in construction and woodworking projects.
In my personal experience, I’ve successfully used it to cut:
- Standard dimensional lumber (2×4s through 12×12s)
- Pressure-treated posts and beams
- Hardwood beams and timbers
- Engineered lumber like LVL and glulam beams
- Composite decking materials
- Some plastic lumber products
Where it really shines is with those difficult-to-cut larger posts and beams—particularly 4×4s, 6×6s, and 8×8s that are typically too large for a miter saw but awkward to cut accurately with a handheld circular saw.
I recently completed a pergola project that required cutting sixteen 8×8 cedar posts to identical lengths with square ends. Before owning the Hercules attachment, this would have been a time-consuming nightmare likely involving multiple tools and a fair amount of frustration. With the attachment, I completed all cuts in under an hour, and every single one was perfectly square and identical in length.
It’s worth noting that while the attachment can technically handle metal cutting when paired with an appropriate blade, I’ve found it’s primarily designed for wood applications. I attempted to cut some aluminum stock with it once, and while it did work, the process felt less refined than with wood materials.
Maximum Cutting Depth and Thickness Capabilities
Understanding the cutting capacity of the Hercules attachment is crucial for determining if it will meet your project needs. This was one of my primary concerns before purchasing, as I frequently work with larger dimensional lumber.
The maximum cutting depth depends on two factors:
- The maximum depth capacity of your circular saw
- The design of the Hercules attachment itself
With my 7-1/4″ circular saw, I can achieve approximately a 2-3/8″ cutting depth in a single pass when using the Hercules attachment. This is sufficient to cut through standard 2″ dimensional lumber (which actually measures 1-1/2″ thick) in a single pass.
For thicker materials like 4×4s (3-1/2″ actual thickness), 6×6s (5-1/2″ actual thickness), or larger beams, multiple passes are required. The beauty of the Hercules attachment is that it maintains perfect alignment for these multiple passes, allowing you to flip the beam and make additional cuts that perfectly align with your initial cut.
The largest material I’ve personally cut with the attachment was a 12×12 cedar timber for a mantelpiece. It required four carefully orchestrated passes, but the end result was remarkably clean—something I couldn’t have achieved with any other tool in my shop short of a large bandsaw.
One important note: while multiple passes can accommodate nearly any thickness of beam, the practical limit comes from the length of the blade guard and the physical dimensions of the attachment itself. In my experience, beams larger than 12×12 become challenging to manage with this system.
Where to Purchase the Hercules Circular Saw Beam Cutter Attachment
When I decided to purchase my Hercules attachment, finding it was actually one of the most straightforward parts of the process. The primary retailer for the Hercules line of tools and accessories is Harbor Freight.
Harbor Freight sells the Hercules Beam Cutter Attachment through several channels:
- In-store at their physical retail locations (where you can examine it firsthand)
- Through their official website (often with free shipping offers for purchases over a certain amount)
- Via their mobile app
I purchased mine during one of Harbor Freight’s frequent sales events, which saved me about 20% off the regular price. I’d recommend watching for these sales if you’re not in a rush to buy.
Occasionally, I’ve seen the attachment available through third-party sellers on platforms like eBay, Amazon Marketplace, and even local classified ads or Facebook Marketplace. However, I’d generally recommend purchasing new directly from Harbor Freight to ensure you’re getting the genuine product with full warranty coverage.
One shopping tip from personal experience: if you’re buying in-store, call ahead to confirm availability. When I went to purchase mine, the first Harbor Freight location I visited was sold out, and I had to drive to another store 40 minutes away.
Cost Analysis: Is It Worth the Investment?
Let’s talk about what might be the deciding factor for many potential buyers: the price. The Hercules Circular Saw Beam Cutter Attachment typically retails between $79.99 and $99.99, depending on current promotions and sales.
At first glance, this might seem like a significant investment for what is essentially an accessory for your circular saw. I initially hesitated for this very reason. However, after using it for numerous projects, I can confidently say it offers exceptional value for the price.
To put this in perspective, consider the alternatives:
- A quality miter saw capable of cutting 4×4s starts at $200-$300
- A dedicated beam cutting saw can cost $500+
- Professional-grade track saw systems start around $400
From this perspective, spending under $100 to significantly expand the capabilities of your existing circular saw represents excellent value. I’ve estimated that the attachment paid for itself within two projects due to:
- Time saved on making precise cuts
- Material saved by eliminating measurement and cutting errors
- The professional quality of the finished work
Additionally, the attachment is built with impressive durability. After a year of regular use in my shop, mine shows minimal signs of wear and continues to perform as well as the day I bought it. The all-metal construction and quality components suggest it will continue to serve reliably for many years.
For professional contractors who regularly work with larger dimensional lumber, I’d consider this attachment an essential purchase that will quickly pay for itself in time and material savings. For serious DIYers and weekend warriors, it represents a cost-effective way to expand your tool capabilities without investing in multiple specialized saws.
Installation Process: Getting Up and Running
Installing the Hercules Beam Cutter Attachment to your circular saw might initially seem intimidating, but I found the process to be surprisingly straightforward. That said, there are some nuances worth knowing to ensure optimal performance.
Here’s my step-by-step installation process based on personal experience:
- Begin by unpacking and identifying all components
- The main attachment body
- Mounting hardware (various bolts, washers, and nuts)
- Adjustment tools (typically a hex key)
- Instruction manual (actually worth reading in this case)
- Prepare your circular saw
- Unplug the saw (safety first!)
- Remove any existing edge guides
- Clean the base plate thoroughly
- Check that the blade guard operates smoothly
- Attach the mounting bracket
- Align the bracket with the mounting holes on your saw’s base plate
- Secure with the provided hardware, but leave slightly loose for adjustment
- Ensure the attachment sits flat against the base plate
- Align the attachment properly
- The cutting guide should be perfectly aligned with your saw blade
- Make a test alignment by placing the saw on a flat surface and dropping the blade to see where it aligns with the guide markings
- Adjust as necessary until perfectly aligned
- Secure all fasteners
- Once alignment is perfect, tighten all mounting hardware securely
- Double-check that nothing has shifted during tightening
- Verify that the blade guard still operates freely
- Perform a test cut
- Use a scrap piece of lumber to make a test cut
- Check for square and accuracy
- Make any final micro-adjustments as needed
The entire installation process typically takes 20-30 minutes the first time. After you’ve done it once, subsequent installations (if you need to remove and reattach it) can be completed in under 10 minutes.
One tip I learned the hard way: take photos of your installation process, particularly the alignment steps. This provides a helpful reference if you need to remove the attachment temporarily and reinstall it later.
Features That Make the Hercules Beam Cutter Stand Out
After using numerous woodworking attachments and jigs over the years, certain features of the Hercules Beam Cutter have impressed me with their thoughtful design and practical utility.
The standout features include:
- Adjustable Angle Cutting
The attachment allows for precise angle adjustments from 0° to 45°, which I’ve found invaluable for creating angled structural connections and decorative cuts. The angle markings are clearly etched and remain legible even after heavy use. - Rigid Guide System
Unlike makeshift jigs that tend to flex or slip, the Hercules features a rigid guide system that maintains perfect alignment throughout the cut. This rigidity is critical when cutting through thick, dense materials where any flexing would result in an imperfect cut. - Quick-Release Clamps
The integrated clamping system secures the attachment to your workpiece with impressive force, yet can be engaged and released quickly without tools. This feature significantly speeds up the workflow when making multiple cuts. - Dust Management Design
The attachment includes thoughtful channels that help direct sawdust away from your cut line, improving visibility and accuracy. While not as effective as a dedicated dust collection system, it’s a useful feature I didn’t expect. - Extended Base Support
The broad base provides exceptional stability during cutting operations, virtually eliminating the wobble that often occurs when using a circular saw freehand on larger materials. This stability translates directly to cleaner, safer cuts. - Material Marking System
Integrated measurement markings and a clear sight line make it easy to align the cut precisely where you want it. I’ve found this particularly useful for repetitive cuts that need to be identical. - Ambidextrous Design
As a left-handed woodworker, I particularly appreciate that the attachment is equally usable from either side. Many woodworking jigs favor right-handed users, so this inclusive design is refreshing.
These features combine to create an attachment that feels less like an afterthought accessory and more like a purpose-built tool. The design reflects a clear understanding of the challenges involved in cutting larger dimensional lumber.
Safety Considerations When Using the Hercules Attachment
Safety should always be paramount when working with power tools, and using the Hercules Beam Cutter Attachment introduces some specific considerations that warrant discussion. I’ve developed these safety protocols through my own use of the attachment.
Always follow these safety practices:
- Secure Your Workpiece Properly
Beyond the attachment’s own clamping system, ensure your beam or lumber is securely supported on both sides of the cut. Unsupported material can bind the blade or fall unpredictably after cutting. - Maintain Proper Stance and Grip
Position yourself with solid footing and maintain a firm grip on both the saw and the attachment. The cutting force required for larger beams can create unexpected movement if you’re not properly braced. - Use Appropriate Blades
Match your blade to the material being cut. For thicker beams, a blade with fewer teeth and larger gullets will clear sawdust more effectively and reduce the risk of binding. - Wait for Full Speed
Always allow your circular saw to reach full speed before beginning the cut. Starting a cut with a blade that isn’t at full RPM can cause kickback, especially in denser materials. - Make Multiple Shallow Passes
For thicker materials, resist the urge to force the saw through in a single pass. Multiple controlled passes reduce strain on the motor and provide cleaner, safer cuts. - Be Mindful of Blade Exposure
The attachment provides additional stability but doesn’t eliminate all blade exposure. Always be aware of blade position and keep hands well away from the cutting path. - Wear Appropriate Safety Gear
At minimum, always use:- Safety glasses or face shield
- Hearing protection
- Dust mask
- Appropriate footwear
- Check for Nails and Foreign Objects
Before cutting, carefully inspect your lumber for nails, screws, or embedded debris that could damage the blade or cause dangerous projectiles. - Disconnect Power When Adjusting
Always unplug your saw before making any adjustments to the attachment or changing blades. - Respect Kickback Potential
Even with the added stability of the attachment, kickback remains a risk, particularly when cutting knots or denser sections of wood. Maintain awareness of this danger throughout operation.
I learned some of these lessons through close calls. During one project cutting old growth Douglas fir beams, I encountered an embedded nail that I hadn’t spotted. The resulting kickback was partially controlled by the attachment, but still forceful enough to be concerning. Since then, I’ve been much more diligent about inspecting reclaimed lumber before cutting.
Maintenance and Care for Longevity
To get the most value from your Hercules Beam Cutter Attachment, proper maintenance is essential. Based on my experience using this tool regularly for over a year, I’ve developed a maintenance routine that keeps it performing like new.
Regular Maintenance Steps:
- Clean After Each Use
- Remove sawdust and debris from all surfaces, particularly the guide rails
- A compressed air blower works wonderfully for clearing tight spaces
- Pay special attention to the clamp mechanisms which can collect fine dust
- Check and Tighten Fasteners
- Vibration from cutting can gradually loosen fasteners
- Develop a habit of checking all visible screws and bolts before each use
- Use the correct size tools to avoid stripping heads
- Lubricate Moving Parts
- Apply a light machine oil to any pivot points and sliding components
- The angle adjustment mechanism particularly benefits from occasional lubrication
- Wipe away excess oil to prevent it from attracting dust
- Inspect for Wear
- Regularly check the guide rails for any signs of wear or damage
- Inspect the clamping mechanisms for proper function
- Look for any cracks or deformation in the mounting bracket
- Proper Storage
- Store in a dry environment to prevent rust
- Either leave attached to your saw or place in the original packaging
- If storing long-term, apply a light coat of protective oil to metal surfaces
- Address Issues Immediately
- If you notice any binding, unusual sounds, or alignment problems, address them before continuing use
- Small issues can quickly become major problems if ignored
I learned the importance of regular maintenance after noticing some rust forming on my attachment following a particularly humid summer in my workshop. A thorough cleaning and light oiling restored it to perfect condition, but I could have avoided the issue entirely with better preventive care.
For those who use the attachment professionally or in demanding conditions, I recommend a more thorough inspection and maintenance routine every 10-15 uses. This small investment of time significantly extends the tool’s useful life.
Troubleshooting Common Issues
Even the best tools occasionally present challenges. After extensive use of the Hercules Beam Cutter Attachment and conversations with other users, I’ve compiled solutions for the most common issues you might encounter.
Issue: Cuts Are Not Square
- Check the attachment’s alignment with your saw blade
- Ensure the attachment is sitting flush against your workpiece
- Verify that your workpiece is properly supported on both sides
- Inspect the guide rails for any bending or damage
- Confirm that all adjustment knobs are fully tightened
Issue: Blade Binding During Cuts
- Ensure you’re using the appropriate blade for the material thickness
- Try making shallower passes through thicker materials
- Check that your lumber isn’t pinching the blade due to internal stress
- Clean any built-up resin from your blade
- Verify the saw is running at full speed before beginning the cut
Issue: Attachment Slipping During Operation
- Clean the clamping surfaces to remove any sawdust or debris
- Increase clamping pressure if adjustable
- Add non-slip material (like router mat) between the attachment and slippery materials
- Ensure your workpiece is adequately supported to prevent flex
- Check for wear on the clamping mechanisms
Issue: Excessive Vibration
- Inspect your circular saw blade for damage or missing teeth
- Ensure the blade is properly secured and tight
- Check all fasteners on both the saw and attachment
- Verify that the attachment is correctly aligned with your saw
- Ensure your workpiece is properly supported
Issue: Difficulty Making Angle Adjustments
- Clean any debris from the angle adjustment mechanism
- Apply a small amount of lubricant to moving parts
- Loosen all adjustment points before attempting to change angles
- Check for any obstructions in the pivot points
- Inspect for damage or bending in the adjustment components
I encountered the “cuts not square” issue during my early use of the attachment. After some troubleshooting, I discovered that while my initial alignment looked perfect, the mounting bracket had shifted slightly during tightening. Developing a proper tightening sequence (alternating screws like you would with lug nuts on a car wheel) resolved the issue permanently.
Pros and Cons Based on Real-World Use
After extensive use across numerous projects, I can offer a balanced assessment of the Hercules Beam Cutter Attachment’s strengths and limitations.
Pros:
- Exceptional Cut Quality
The precision achieved with this attachment exceeds what’s possible with freehand circular saw cuts, rivaling results from much more expensive dedicated beam-cutting tools. - Versatility
The ability to handle various materials and cutting angles makes this a versatile addition to any workshop. - Cost-Effectiveness
Significantly less expensive than purchasing dedicated tools for cutting large dimensional lumber. - Portability
Unlike stationary equipment, the attachment can be taken to job sites or used in tight spaces where larger tools won’t fit. - Safety Improvements
The added stability and control reduce many of the risks associated with freehand circular saw operation on large stock. - Simple Learning Curve
Most users can achieve excellent results almost immediately, without extensive practice. - Durable Construction
The predominantly metal construction withstands jobsite conditions and repeated use. - Compatibility
Works with a wide range of circular saw models, maximizing utility for those with existing tools.
Cons:
- Setup Time
There’s undeniably more setup time required compared to simply picking up your circular saw. - Thickness Limitations
Despite the ability to make multiple passes, very thick beams remain challenging and time-consuming to cut. - Weight Addition
The attachment adds noticeable weight to your circular saw, potentially increasing fatigue during extended use. - Storage Bulk
When attached to your saw, it significantly increases the storage footprint. - Occasional Recalibration Needed
Heavy use or transport can sometimes necessitate realignment of the attachment. - Limited Curve Cutting
By design, this attachment is focused on straight cuts, removing some of the circular saw’s versatility for curved cutting. - Learning Adjustment
Some users may need to adapt their cutting technique, particularly when making multiple passes.
For my woodworking style and project needs, the pros far outweigh the cons. The attachment has fundamentally changed how I approach beam cutting tasks, making previously dreaded cuts straightforward and even enjoyable. However, users with different needs might weigh these factors differently.
Is the Hercules Beam Cutter Right for Professionals?
As someone who straddles the line between serious DIY enthusiast and occasional professional contractor, I’ve had the opportunity to evaluate the Hercules attachment from both perspectives. The question of its suitability for professional use deserves careful consideration.
For professional contractors and tradespeople, several factors come into play:
Durability Under Daily Use
The Hercules attachment features predominantly metal construction with quality fasteners and components. In my experience, it holds up admirably under regular use. However, professionals subjecting it to daily heavy use in challenging conditions might notice faster wear than casual users. That said, given its reasonable price point, even if replacement is needed after a couple of years of intense professional use, the value proposition remains strong.
Speed and Efficiency Considerations
For professionals, time is quite literally money. The attachment does require some setup time, which might initially seem like a drawback. However, the time saved by achieving perfect cuts on the first attempt—eliminating do-overs and extensive trimming or sanding—more than compensates for setup time in most scenarios.
Project Versatility
Professional contractors often face diverse cutting challenges across projects. The Hercules attachment shines particularly on:
- Deck posts and beams
- Structural timber framing
- Pergola construction
- Fencing projects
- Timber retaining walls
For these applications, the attachment proves invaluable. However, professionals focusing primarily on finish carpentry or cabinetry might find less frequent use for it.
Job Site Practicality
The attachment adds bulk to a circular saw but remains far more portable than alternatives like large miter saws or stationary equipment. For professionals who need precision cutting capabilities at changing job sites, this balance of portability and performance is compelling.
Return on Investment
For a professional contractor, the attachment typically pays for itself within just a few jobs through:
- Reduction in material waste from miscuts
- Time savings from precise first-time cuts
- Ability to take on projects requiring precise beam cutting without renting specialized equipment
- Extended life of circular saw blades due to controlled cutting conditions
Several contractor friends who borrowed my attachment subsequently purchased their own, citing particularly the ability to create perfect square ends on pressure-treated posts without access to a large miter saw as a “game-changer” for deck building.
In my assessment, the Hercules Beam Cutter Attachment is indeed suitable for professional use, particularly for contractors working in deck building, outdoor structures, and timber framing. Its combination of precision, durability, and value makes it a worthwhile addition to a professional tool arsenal.
Alternatives to Consider
While I’ve found the Hercules Beam Cutter Attachment to be an exceptional tool, it’s worth exploring alternatives to ensure you’re making the best choice for your specific needs. Here are some alternatives I’ve either used personally or researched extensively:
1. Track Saw Systems
Track saws like those from Festool, Makita, or DeWalt offer precision cutting with a rail system. They excel at long straight cuts and can handle sheet goods better than the Hercules attachment. However, they typically cost 4-5 times more and don’t handle thick beams as efficiently.
2. Beam Cutting Miter Saws
Dedicated large-capacity miter saws can cut beams in a single pass. The advantage is speed and simplicity, but the significant disadvantages include high cost (often $500+) and limited portability. These make sense for shop-based operations with frequent beam cutting needs.
3. DIY Circular Saw Jigs
Many woodworkers create their own beam-cutting jigs using plywood and clamps. These can be effective when well-designed and can cost under $20 in materials. However, they typically lack the durability, precision adjustment features, and ease of use of the Hercules attachment.
4. Portable Bandsaw With Stand
For very large timbers, a portable bandsaw mounted in a stand provides excellent cutting capacity. These setups offer great versatility for irregular cuts but require significant investment and shop space.
5. Other Manufacturer’s Beam Cutter Attachments
Several tool manufacturers offer their own versions of beam cutter attachments. In my research, most comparable options from major brands cost 30-50% more than the Hercules while offering similar functionality. Some provide enhanced features like integrated dust collection, but the core performance remains comparable.
After trying several of these alternatives, I continue to reach for the Hercules attachment for most beam cutting tasks due to its balance of cost, performance, and convenience. However, for those with specific requirements or brand preferences, these alternatives warrant consideration.
Final Verdict: Who Should Buy the Hercules Beam Cutter Attachment?
After thoroughly exploring every aspect of the Hercules Circular Saw Beam Cutter Attachment, it’s time to distill this information into actionable advice about who would benefit most from this tool.
You should strongly consider purchasing this attachment if:
- You regularly work with dimensional lumber larger than 2×4s
- You’re planning deck, pergola, or outdoor structure projects
- You need precise, square cuts on posts and beams
- You want to expand your existing circular saw’s capabilities
- You’re looking for professional-level results without professional-level equipment costs
- You need portable beam-cutting capabilities for job site work
- You value precision and safety when working with larger stock
You might want to consider alternatives if:
- You very rarely cut anything larger than standard dimensional lumber
- You already own specialized beam-cutting equipment
- You’re primarily focused on sheet goods rather than dimensional lumber
- You require extremely high volume production cutting
- You have physical limitations that make handling the additional weight challenging
In my experience, the Hercules Circular Saw Beam Cutter Attachment represents one of the best value-to-performance ratios of any tool accessory I’ve purchased in recent years. It has transformed challenging cuts into simple operations and elevated the quality of my finished projects.
For weekend warriors tackling their first deck, seasoned DIYers building outdoor structures, or professionals needing portable precision on job sites, this attachment offers capabilities that would otherwise require much more expensive specialized equipment.
The modest investment required—typically under $100—delivers returns in precision, material savings, and expanded capabilities that continue to impress me even after extended use. If your projects involve beam cutting of any kind, this attachment deserves serious consideration as an addition to your tool arsenal.
Have you used the Hercules Beam Cutter Attachment yourself? I’d love to hear about your experiences in the comments. And if you have questions about specific applications or compatibility with your saw, feel free to ask—I’m happy to share more insights from my time with this game-changing tool.